

I have found this tutorial online to create your own ambi light.
The tutorial was not very clear for me and some parts did not work. So here is the adjusted tutorial. I also put kodi on the raspberry pi zero. It is slow with navigating but it plays the movies perfectly. This way I use the Pi at its full potential. Now let’s create your own ambi light
This tutorial does not work for 4K television. However it is possible with a lightberry 2 and a 4k hdmi spitter. If I buy a 4k television then I will do an other tutorial for the 4k version of this
Shopping list to create your own ambi light
I got the raspberry PI zero from Ebay (thePiHut). The rest came from amazone or from local shops. Just look for your cheapest options and don’t overspend. This shopping list is from GreatScott. He is the one who made the video.
Parts list:
Amazon.com
- APA102 LED Strip: https://amzn.to/3nKCohX
- HDMI Splitter: https://amzn.to/2XA3HAA
- HDMI 2 AV Converter: https://amzn.to/35ysoSF
- 5V 8A Power Supply: http://amzn.to/2gP1nOl
- USB Video Grabber: https://amzn.to/2LsDQIz (Make sure it has the right chipset)
- USB Hub: https://amzn.to/38CNh0N
- WiFi Dongle: https://amzn.to/2LtcbqK
- Wago Terminal: https://amzn.to/2MXR6W0
- Velcro Tape: https://amzn.to/39rSk39
Ebay:
- APA102 LED Strip: http://rover.ebay.com/rover/1/711-532…
- HDMI Splitter: http://rover.ebay.com/rover/1/711-532…
- HDMI 2 AV Converter: http://rover.ebay.com/rover/1/711-532…
- Raspberry Pi Zero: http://rover.ebay.com/rover/1/711-532…
- 5V 8A Power Supply: http://rover.ebay.com/rover/1/711-532…
- USB Video Grabber: http://rover.ebay.com/rover/1/711-532… (Make sure it has the right Chipset)
- 1x USB Hub: http://rover.ebay.com/rover/1/711-532…
- 1x WiFi Dongle: http://rover.ebay.com/rover/1/711-532…
- Wago Terminal: http://rover.ebay.com/rover/1/711-532…
- Velcro Tape: http://rover.ebay.com/rover/1/711-532…
Tools
You need to solder a bit so make sure you have the tools to do so. I never soldered in my life. I learned it watching YouTube videos. If I can do it anybody can do it.
For the ducht folks take a look at this. But remember do not overspend. Also look at local shops or online for better prices
Getting the PI Ready:
In the video above it is installed with raspberian. I installed openElec on the PI as this gives me Kodi aswell. You can download the image here http://openelec.tv/get-openelec/category/56-raspberry-pi-builds
- Download the image for the Pi 1 as this is compatible with the raspberry pi zero
- Insert the SD card into your SD card reader. You can use the SD card slot if you have one, or an SD adapter in a USB port. Note the drive letter assigned to the SD card. You can see the drive letter in the left hand column of Windows Explorer, for example G:
- Download the Win32DiskImager utility from the Sourceforge Project page as an installer file, and run it to install the software.
- Run the
Win32DiskImagerutility from your desktop or menu. - Select the image file you extracted earlier.
- Select the drive letter of the SD card in the device box. Be careful to select the correct drive: if you choose the wrong drive you could destroy the data on your computer’s hard disk! If you are using an SD card slot in your computer and can’t see the drive in the Win32DiskImager window, try using an external SD adapter.
- Click ‘Write’ and wait for the write to complete.
- Exit the imager and eject the SD card.
- Put the SD card in the raspberry pi
Hardware
Now for the fun part. Watch the tutorial from youtube first on this page so you have an idea what to expect. It looks overwelming but trust me it is not that diffucult.
You do not have to solder. You can buy corners for APA102 LED Strip on Ebay or Ali but they did not work for me. But then again I already start putting the ledstrips on the tv before I know about these corners. I ordered them but never got them to work. So I started to solder the corners.
By watching the YouTube above and seeing these pictures you should be able to do it
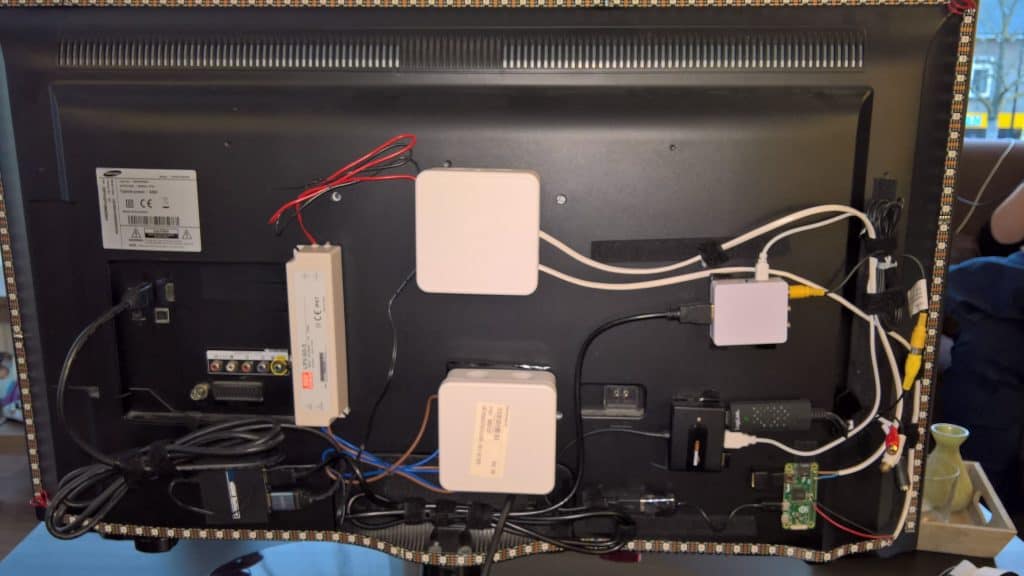
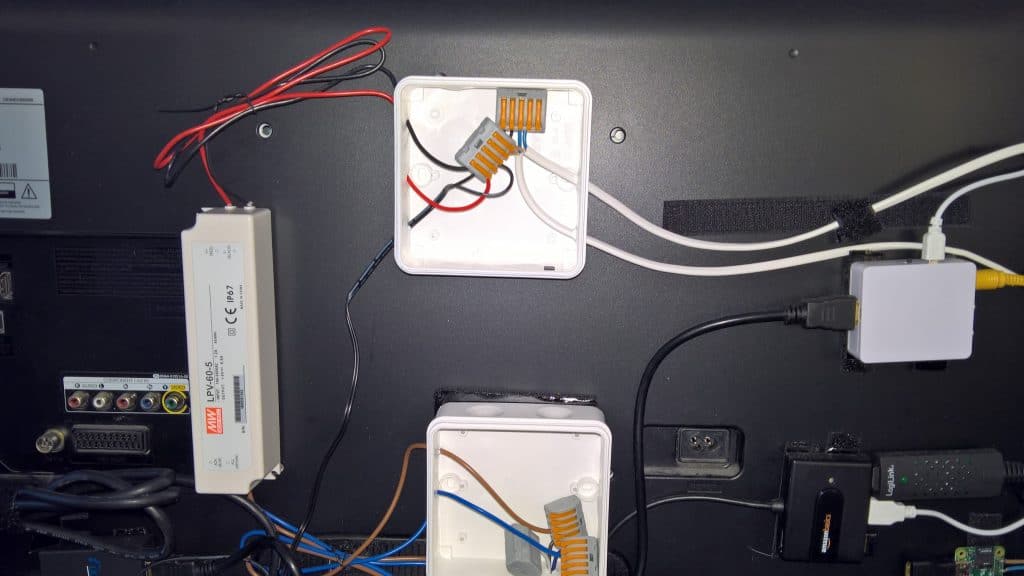
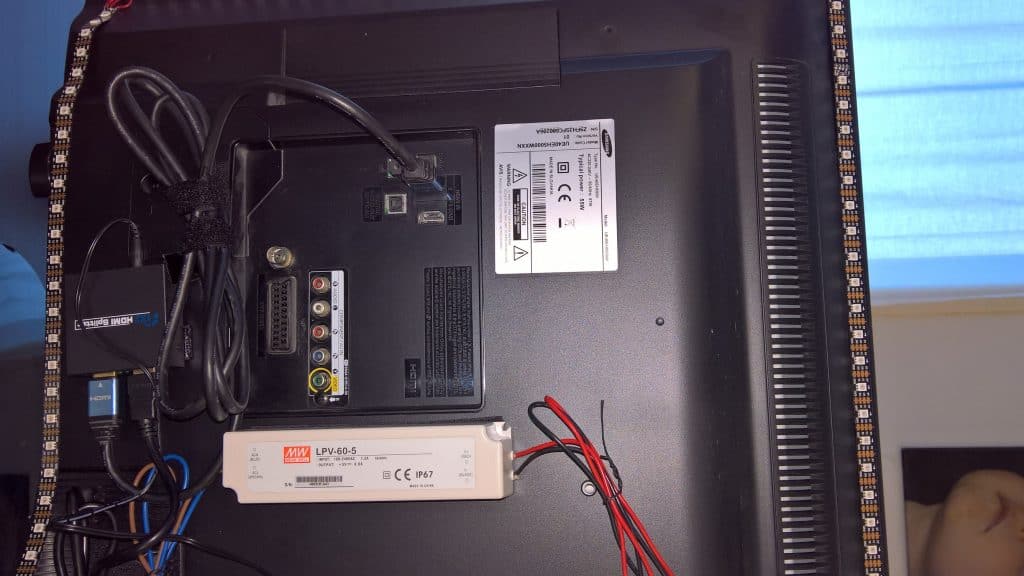
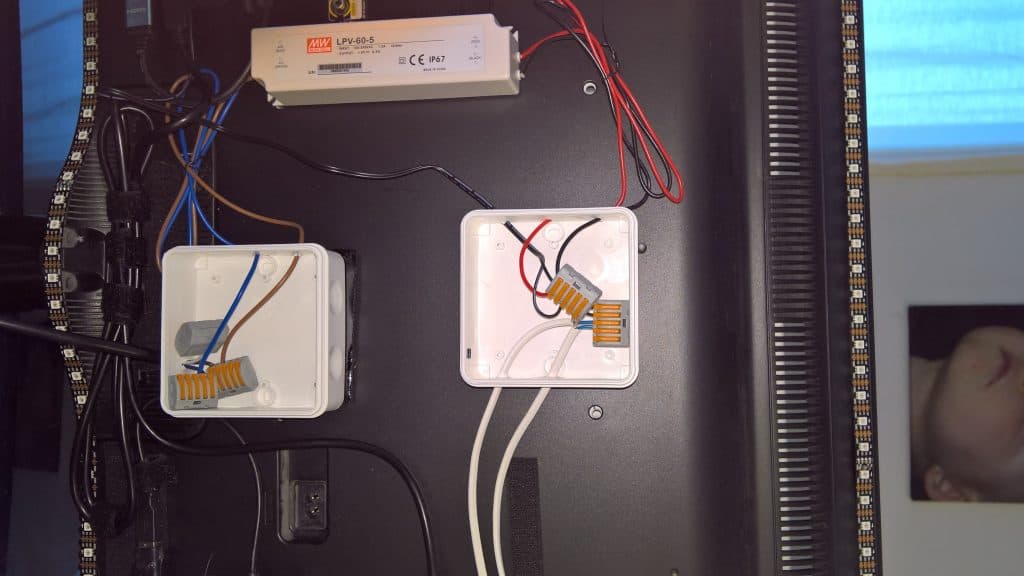
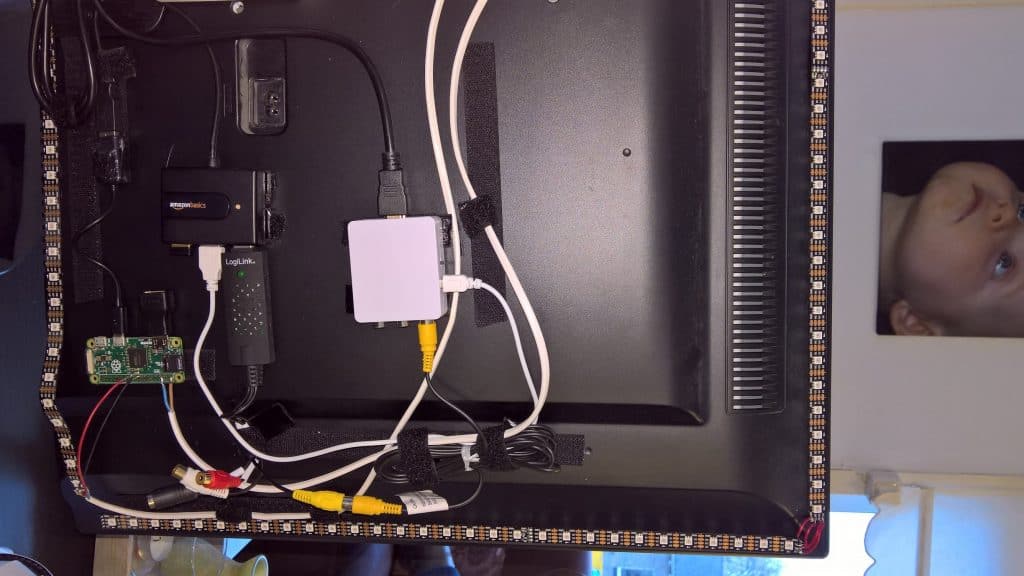
On the picture the HDMI from the source is not yet connected to the splitter and the HDMI from the PI to my home cinema set is not yet connected
Software
Now that the hardware part is done and your Pi connected we need to install Hyperion on the PI. This is the peace of software what controls the lights.
The installation/update of Hyperion is very easy.
1. Download HyperCon (The Hyperion Configuration File Builder)
HyperCon information and download
2. Start HyperCon
3. Click on the SSH – Tab
4. Connect with your system you want to install Hyperion on
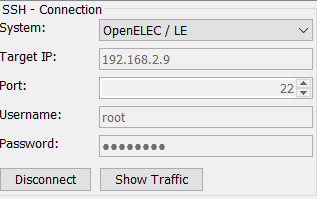
First, you need to input some information.
- System: Choose your OpenElec
- Target IP: The IP address of the system you want to install Hyperion. (See HINT below)
- Port: The ssh port, usually on all systems: 22
- Username: Username = root
- Password: Password = openelec
If you have done your settings just click on “Connect“.If all greyed out buttons on the HyperCon SSH tab below are enabled now, you are connected!
Target IP HINT: If you don´t know it, search it with Advanced IP-Scanner (Windows only) you don´t need to install it, just use “Execute” and then click the “Scan” button. Now search for phrases like “openelec/osmc/raspberry” and type in that ip address listed there. Or you login on your router and search their for the dhcp lists.
5. Now click the “Inst./Upd. Hyperion” button.
NOTE: You could use this button also to UPDATE Hyperion to a newer version.
6. Now be patient (installation may take up to 5 minutes).
Afterwards you see the script output. If you see no “Critical Error” message, all went good.
It is possible that your system reboots now automatically!
Now that the software is installed we need to configure it.
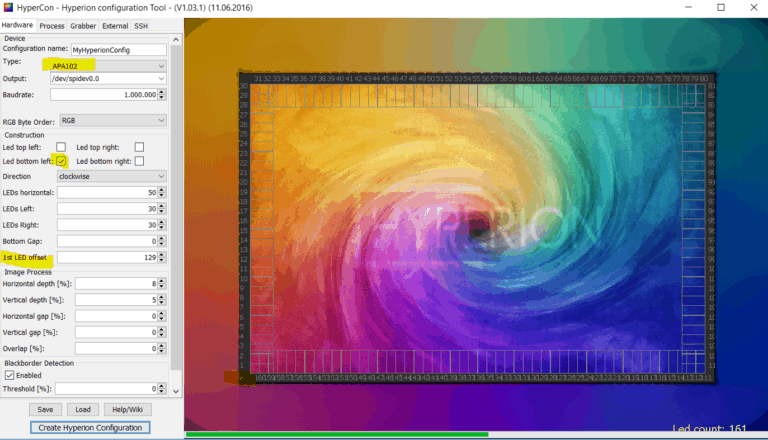
- Open the hardware tab
- Type: APA102
- Select where your first led light is.
- Fill in the number of how many led lights you have per side.
- The off set is where the first led light is. In my case it was in the lef corner. So the 0 needs to be in the left corner
- Press create configuration and then press save to save the the json file. You need to do this every time you change something.
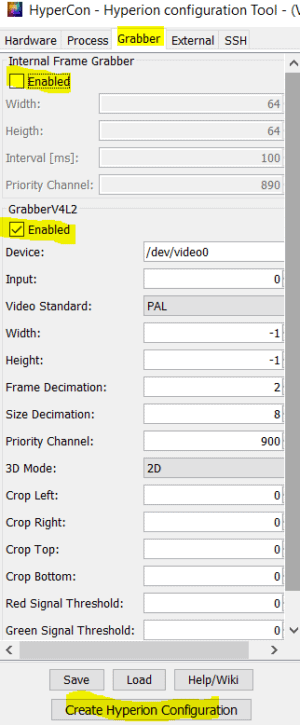
- Go to the TAB grabber
- De-select Internal frame grabber
- Select GrabberV4L2
- leave the rest of the settings as is
- Click on create Hyperion Configuration
- go to ssh tab
- Make sure you have it connected to the Pi and press send config
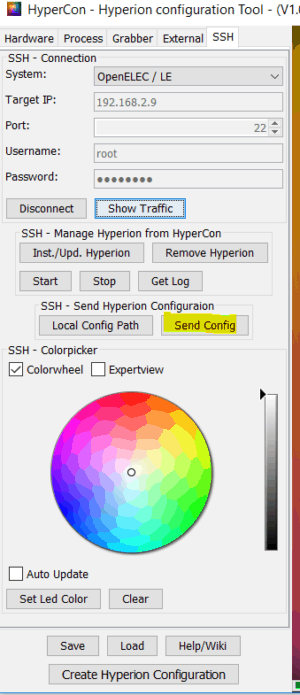
- Now press the start button
- It should work now. If it does not work then you need to adjust the settings a little bit
- You can take a screenshot to see what the grabber sees by right click on the screen and select take grabber screenshot
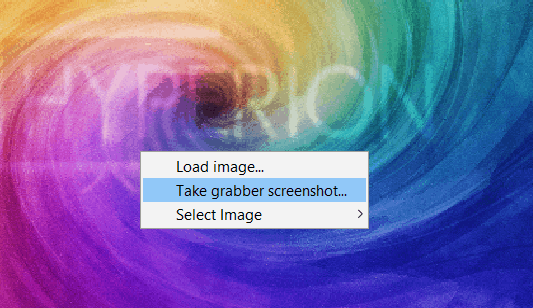
The image can never be 100 percent without some blury in it. If it is to blury then you can adjust some settings. If you cant get it right then replace your HDMI2AVI converter and in worst case your grabber. It took me 2 HDMI2AVI converters to get it right.
You can find more information on the hyperion website: https://hyperion-project.org/wiki/Main
If you want to use kodi. then connect a HDMI from kodi to your TV. You can use a app on your phone as a remote.
You now have now finished the guide create your own AMBI light
MY setup
- The setupbox is connected to the xbox
- Xbox is connected to my home cinema set (HDMI1)
- Kodi is connected to my home cinema set (HDIMI2)
- My home cinemaset is connected to the HDMI splitter
- The hdmi splitter is connected to the TV and to the HDMI2AV converter
So all my signals and audio are going to my Home Cinema. This way I always have great audio, picture and AMBI light no matter what I watch
Also My Xbox turns on my Home cinema set and my TV. So I have one button that switch on everything
There was only one thing wrong and that was that my hdmi2av converter sends out an no signal image to the pi once the tv is off. Meaning the leds turn into a rainbow collor. I first solved this to put the HDMI2AV converter on NTSC by the swith when I turned off the tv. I did not wanted to do this everytime. It need to turn off and on automaticly
Lucky me I have home-assistant.io running. I connected the hyperion to this system. Now if home assistant detects my home cinema as off then it send an black signal to hyperion and this will turn the leds off. If my home cinema set comes online it will turn on the lights. This is something for an other tutorial based on home automation. If you have a good HDM2AV converter then you do not need this.
And this conclude create your own ambi light guide


